
PrintHand Setup & Configuration
Overview
PrintHand is a mobile and desktop application that allows users to print documents, photos, emails, and other files directly from their devices to a wide range of printers. It supports both wired and wireless printing methods, making it a convenient solution for printing without relying on a PC.
This guide explains how to install, configure, and troubleshoot the PrintHand application on a VirtuBox Kiosk.
Prerequisites
Before starting the installation, ensure the following requirements are met:
- Android Box is connected to the Kiosk.
- Kiosk is configured and ready.
- A valid Kiosk Account is available.
- Printer Integration is enabled.
- Printer License is assigned.
- Printer is connected.
- USB cable is available.
- No Google Account should be logged into the Android Box.
Check Google Account
Before installing PrintHand, verify that no Google Account is signed in.
Steps
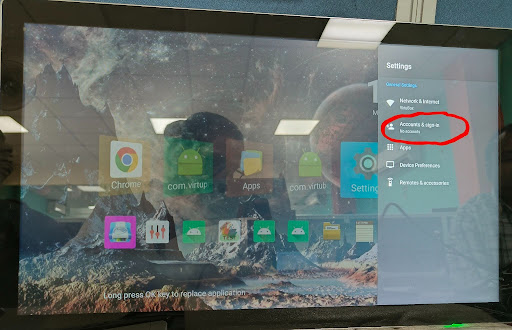
- Go to the Home Screen.
- Open Settings.
- Navigate to Accounts & Sign In.
- Check whether any Google Account is logged in.
Note
- If no account is logged in, continue with the installation.
- If a Google Account is logged in, remove it first by following the FAQ section.
Download PrintHand
Download the PrintHand application from the following URL:
https://www.virtubox.io/download
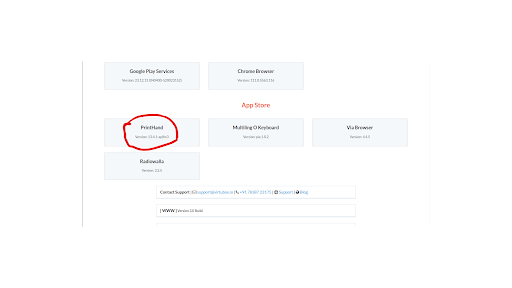
After downloading, install the application.
Install & Configure PrintHand
Follow the steps below to configure PrintHand.
Step 1
Open the PrintHand application.
Step 2
Tap the three-dot menu located in the top-right corner.
Step 3
Select Settings.
Step 4
Open Libraries.
Step 5
Download all available libraries.
Wait until all libraries have been downloaded successfully.
Step 6
Press the Back button.
Step 7
Press Back once again to return to the PrintHand home screen.
Step 8
Tap Add Printer.
Step 9
Select Printer Setup Wizard.
Step 10
Connect the printer to the Android Box using a USB cable.
Step 12
Click Next.
Step 13
When the printer is detected, select:
1 Printer Found
Wait until the processing is completed.
Step 14
Scroll down and select Print Test.
Step 15
Click Next.
Wait until processing completes.
Step 16
Print the Test Page.
Step 17
Verify that the Test Page has been printed successfully.
Step 18
Click Next.
Congratulations! 🎉
PrintHand has been configured successfully.
Prepare a Kiosk for PrintHand
Before using PrintHand, prepare your Kiosk using the following steps.
Step 1
Connect the Android Box to the Kiosk using:
- HDMI Cable
- Touch USB Cable
- Power Adapter
Step 2
Install the Kiosk Application.
Step 3
Add the Kiosk Account.
Step 4
Kiosk Account → Kiosk Integration → Printer
Enable Printer Integration.
Step 5
Assign a Printer License to the Kiosk.
Contact Ashish to obtain a Printer License.
Step 6
Click Update Kiosk.
Your Kiosk is now ready to use PrintHand.
Configure Paper Size (EPSON PM-520)
To enable borderless printing:
- Open PrintHand.
- Tap the three-dot menu.
- Select Settings.
- Open Manage Printer.
- Select the connected printer.
- Open Paper.
- Select:
10 × 15 cm (4 × 6 in) Borderless
Supported Printers
Before using PrintHand, verify that your printer is supported.
Visit:
https://printhand.com/supported_printers.php
Frequently Asked Questions (FAQ)
Q1. What should I do if the Test Print is not generated after Step 18?
If the Test Print is not generated after completing Step 18, follow these steps:
- Go to the Home Screen of the Kiosk.
- Open Settings.
- Navigate to Apps.
- Locate and open the PrintHand application.
- Tap Clear Data, then Force Stop.
- Reopen the PrintHand application.
- Repeat the installation process starting from Step 2 of the PrintHand Installation & Configuration section.
Q2. What should I do if a Google Account is logged in?
PrintHand should be configured without any Google Account logged into the Android Box.
To remove the account:
- Go to the Home Screen.
- Open Settings.
- Navigate to Accounts & Sign In.
- Select the Google Account.
- Tap Remove Account.
- Restart the installation process from Step 1 of the PrintHand Installation & Configuration section.
Q3. How do I prepare a Kiosk before using the PrintHand application?
Before installing PrintHand, ensure that the Kiosk is properly configured.
-
Connect the Android Box to the Kiosk using:
- HDMI Cable
- Touch USB Cable
- Power Adapter
-
Install the Kiosk Application.
-
Add the Kiosk Account.
-
Navigate to:
Kiosk Account → Kiosk Integration → Printer
-
Enable Printer Integration.
-
Assign a Printer License to the Kiosk (Contact Ashish for the license).
-
Click Update Kiosk.
The Kiosk is now ready for PrintHand installation.
Q4. How do I configure the paper size for EPSON PM-520 Borderless Printing?
To configure borderless printing:
- Open the PrintHand application.
- Tap the three-dot menu in the top-right corner.
- Open Settings.
- Select Manage Printer.
- Choose the connected printer.
- Select Paper.
- Choose 10 × 15 cm (4 × 6 in) Borderless.
This will enable borderless printing for the EPSON PM-520 printer.
Troubleshooting Checklist
Before raising a support ticket, verify the following:
- Android Box is powered on.
- Printer is connected via USB.
- Printer License is assigned.
- Printer Integration is enabled.
- All PrintHand libraries are downloaded.
- No Google Account is logged in.
- Printer is supported by PrintHand.
- Test Print has been attempted.
Notes
Important
- Always download all PrintHand libraries before configuring the printer.
- Do not log in with a Google Account while using PrintHand.
- If you clear PrintHand data, repeat the configuration process.
- Verify printer compatibility before installation.