
PrintHand Setup & Configuration
Overview
PrintHand is a mobile and desktop application that allows users to print documents, photos, emails, and other files directly from their devices to a wide range of printers. It supports both wired and wireless printing methods, making it a convenient solution for printing without relying on a PC.
This guide explains how to install, configure, and troubleshoot the PrintHand application on a VirtuBox Kiosk.
Prerequisites
Before starting the installation, ensure the following requirements are met:
- Android Box is connected to the Kiosk.
- Kiosk is configured and ready.
- A valid Kiosk Account is available.
- Printer Integration is enabled.
- Printer License is assigned.
- Printer is connected.
- USB cable is available.
- No Google Account should be logged into the Android Box.
Check Google Account
Before installing PrintHand, verify that no Google Account is signed in.
Steps
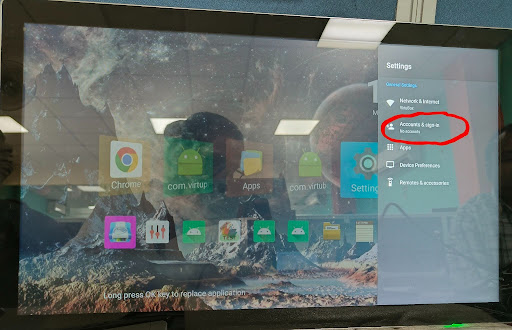
- Go to the Home Screen.
- Open Settings.
- Navigate to Accounts & Sign In.
- Check whether any Google Account is logged in.
Note
- If no account is logged in, continue with the installation.
- If a Google Account is logged in, remove it first by following the FAQ section.
Download PrintHand
Download the PrintHand application from the following URL:
https://www.virtubox.io/download
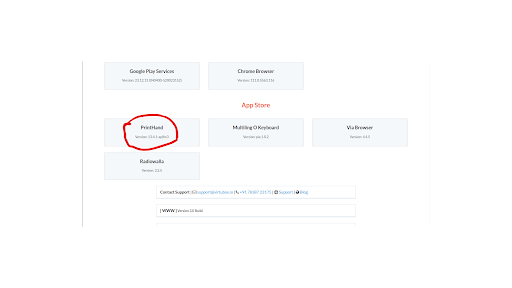
After downloading, install the application.
Install & Configure PrintHand
Follow the steps below to configure PrintHand.
- Step 1
Open the PrintHand application.
- Step 2
Tap the three-dot menu located in the top-right corner.
- Step 3
Select Settings.
- Step 4
Open Libraries.
- Step 5
Download all available libraries.
Wait until all libraries have been downloaded successfully.
- Step 6
Press the Back button.
- Step 7
Press Back once again to return to the PrintHand home screen.
- Step 8
Tap Add Printer.
- Step 9
Select Printer Setup Wizard.
- Step 10
Connect the printer to the Android Box using a USB cable.
- Step 12
Click Next.
- Step 13
When the printer is detected, select:
1 Printer Found
Wait until the processing is completed.
- Step 14
Scroll down and select Print Test.
- Step 15
Click Next.
Wait until processing completes.
- Step 16
Print the Test Page.
- Step 17
Verify that the Test Page has been printed successfully.
- Step 18
Click Next.
Congratulations! 🎉
PrintHand has been configured successfully.
Prepare a Kiosk for PrintHand
Before using PrintHand, prepare your Kiosk using the following steps.
- Step 1
Connect the Android Box to the Kiosk using:
- HDMI Cable
- Touch USB Cable
- Power Adapter
- Step 2
Install the Kiosk Application.
- Step 3
Add the Kiosk Account.
- Step 4
Kiosk Account → Kiosk Integration → Printer
Enable Printer Integration.
- Step 5
Assign a Printer License to the Kiosk.
Contact Ashish to obtain a Printer License.
- Step 6
Click Update Kiosk.
Your Kiosk is now ready to use PrintHand.
Configure Paper Size (EPSON PM-520)
To enable borderless printing:
- Open PrintHand.
- Tap the three-dot menu.
- Select Settings.
- Open Manage Printer.
- Select the connected printer.
- Open Paper.
- Select:
10 × 15 cm (4 × 6 in) Borderless
Supported Printers
Before using PrintHand, verify that your printer is supported.
Visit:
https://printhand.com/supported_printers.php
Frequently Asked Questions (FAQ)
Q1. What should I do if the Test Print is not generated after Step 18?
If the Test Print is not generated after completing Step 18, follow these steps:
- Go to the Home Screen of the Kiosk.
- Open Settings.
- Navigate to Apps.
- Locate and open the PrintHand application.
- Tap Clear Data, then Force Stop.
- Reopen the PrintHand application.
- Repeat the installation process starting from Step 2 of the PrintHand Installation & Configuration section.
Q2. What should I do if a Google Account is logged in?
PrintHand should be configured without any Google Account logged into the Android Box.
To remove the account:
- Go to the Home Screen.
- Open Settings.
- Navigate to Accounts & Sign In.
- Select the Google Account.
- Tap Remove Account.
- Restart the installation process from Step 1 of the PrintHand Installation & Configuration section.
Q3. How do I prepare a Kiosk before using the PrintHand application?
Before installing PrintHand, ensure that the Kiosk is properly configured.
-
Connect the Android Box to the Kiosk using:
- HDMI Cable
- Touch USB Cable
- Power Adapter
-
Install the Kiosk Application.
-
Add the Kiosk Account.
-
Navigate to:
Kiosk Account → Kiosk Integration → Printer
-
Enable Printer Integration.
-
Assign a Printer License to the Kiosk (Contact Ashish for the license).
-
Click Update Kiosk.
The Kiosk is now ready for PrintHand installation.
Q4. How do I configure the paper size for EPSON PM-520 Borderless Printing?
To configure borderless printing:
- Open the PrintHand application.
- Tap the three-dot menu in the top-right corner.
- Open Settings.
- Select Manage Printer.
- Choose the connected printer.
- Select Paper.
- Choose 10 × 15 cm (4 × 6 in) Borderless.
This will enable borderless printing for the EPSON PM-520 printer.
Troubleshooting Checklist
Before raising a support ticket, verify the following:
- Android Box is powered on.
- Printer is connected via USB.
- Printer License is assigned.
- Printer Integration is enabled.
- All PrintHand libraries are downloaded.
- No Google Account is logged in.
- Printer is supported by PrintHand.
- Test Print has been attempted.
Notes
Important
- Always download all PrintHand libraries before configuring the printer.
- Do not log in with a Google Account while using PrintHand.
- If you clear PrintHand data, repeat the configuration process.
- Verify printer compatibility before installation.